
Better Sleep Now. Pay Later.
Perfectly Snug Controller App
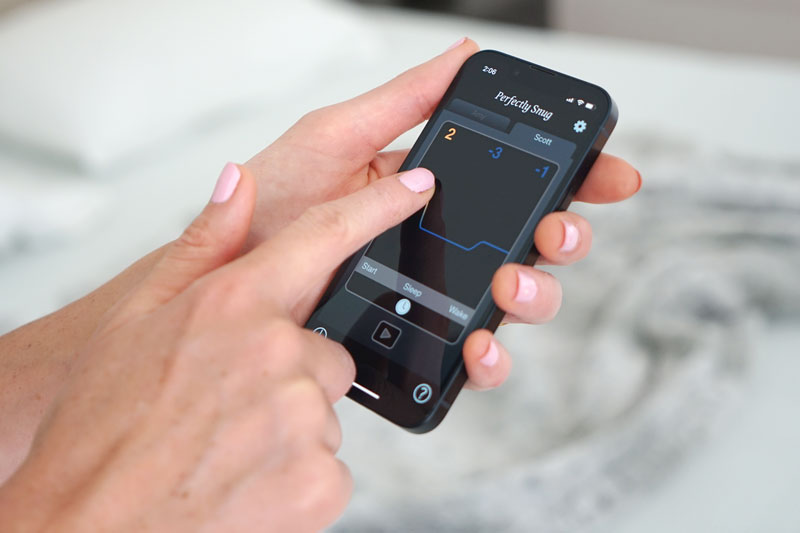
Remote Control on Your Phone
The Smart Topper is recommended to be setup and controlled using the ‘Perfectly Snug Controller’ App.
The Smart Topper is best used when connected to your home WiFi, but it can be operated when connected directly to your phone or even with no phone at all, by simply using the buttons in the side of the Smart Topper.
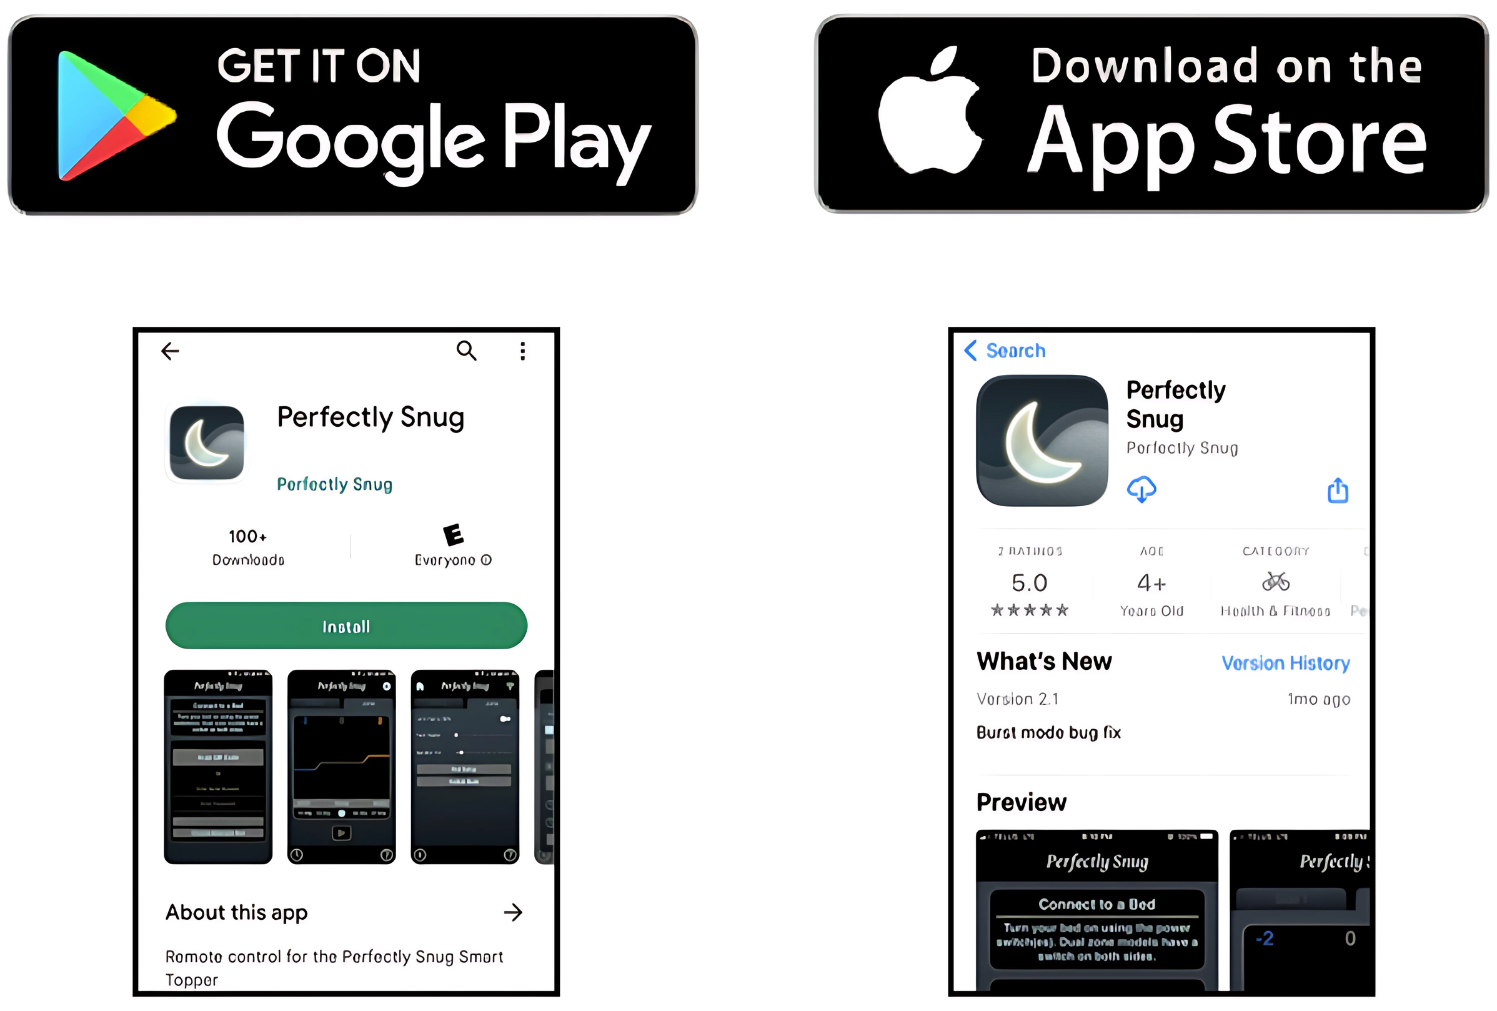
Installing and Updating the App
Visit the Apple App Store or Google Play Store and search for "Perfectly Snug". [Note: Do not select our previous app which is called "Perfectly Snug Controller."] Select the App and touch Install.
Occasionally, there may be updates to the App. If your device has been setup to automatically update apps, then you don't need to do anything. Otherwise, you may need to periodically check for updates.
Click here to download a pdf preview of our upcoming in-app tutorial. This simple document will explain how to use the app clearly, step by step, with screenshots. (Ideal for reading on mobile devices.)
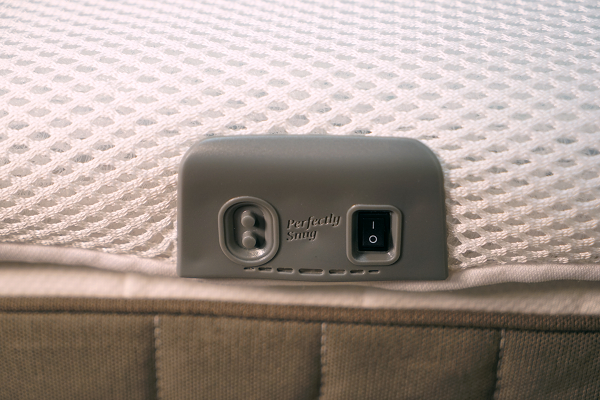
Using the Smart Topper Without the App
Without the App or a WiFi connection you will be able to:
1. Start the Smart Topper by pressing the up/down bedside buttons.
(All three phases of the night will be set to the same level and it will run for 10 hrs.)
2. Turn off or stop the Smart Topper by turning the power switch off.
(You don't need to do this - leaving your Smart Topper switched on at all times is recommended if you want the scheduler or preheating to operate)
This functionality, while basic, will still provide the sleeper with improved sleep quality and a good experience with the product. However, it is better to have access to the full functionality through the App.
After you have setup your Smart Topper with the App, you will not need the App often. Simply use the buttons on the side of the topper to make temperature adjustments.
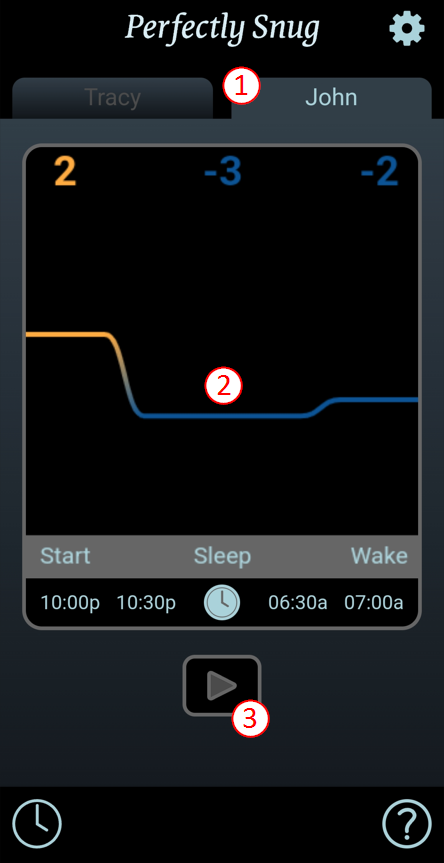
Overnight Screen
This is the main screen you will use to set your temperature preferences.
1. Each side of the Smart Topper can be controlled by touching one of the tabs near the top of the screen.
2. The bed goes through three sequential phases during the night: Start, Sleep, and Wake.
Start: Gets your Smart Topper ready for you.
Sleep: For the majority of the night, when the Topper will take your temperature and adjust accordingly.
Wake: So you can wake up to warmer or cooler temperatures.
Each phase may be separately adjusted by touching the line and sliding it up and down. The number displayed indicates levels of cooling or warming. Cooling is indicated in blue, warming in orange.
3. Once the desired levels have been set, touching the grey Run Button will initiate operation of the Smart Topper and the button will change to blue.
If the Smart Topper has scheduling enabled (see Scheduler), then it will begin operating automatically at the preset bedtime. Your Smart Topper must be left switched "on" at the manual controller in order for the Scheduler to function.
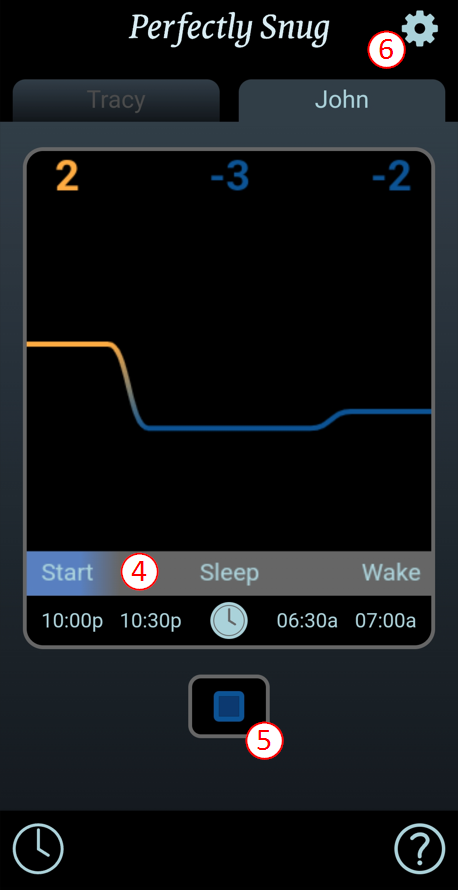
4. The grey bar (where it says Start, Sleep and Wake) will turn blue from left to right to indicate the progress.
5. When the bed is running, the Play Button will change to a blue square Stop Button. Touching this button will stop the bed.
6. You can access the Settings Screen by touching the gear icon in the top right, where you can change Fan Speed, Heater function, and more.
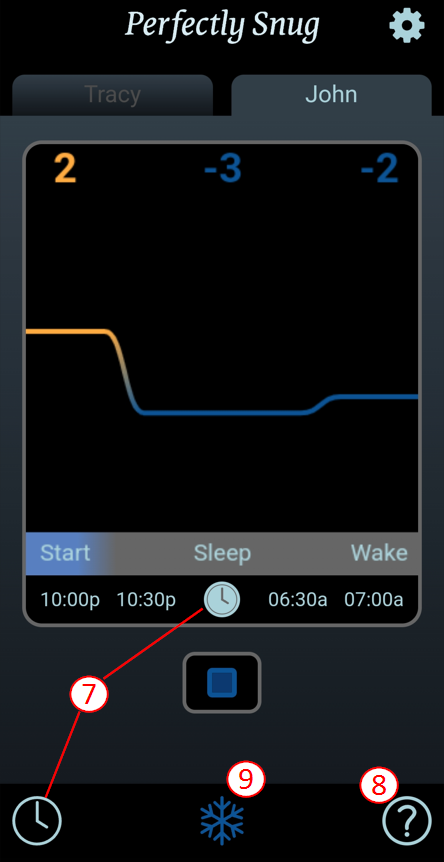
7. You can access the Scheduler by touching the clock icon on the time bar, or at the bottom left of your screen.
8. The Question Mark icon will bring you to helpful FAQ information.
9. When the bed is performing a Cool Burst, a snowflake icon appears near the bottom of the screen. When it is performing a Warm Burst a sun icon appears. You can touch this icon to stop the burst.
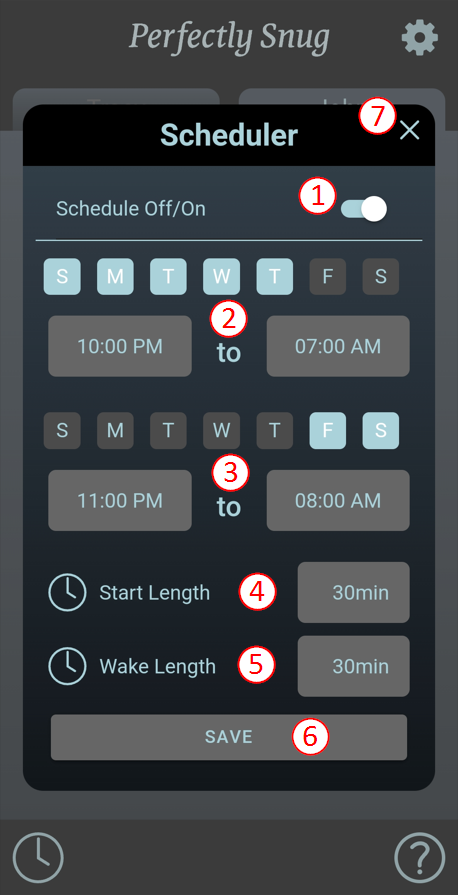
Scheduler Screen
1. Touch the 'Schedule Off/On' toggle to enable or disable the Scheduler. If the Scheduler is disabled, your Smart Topper will not turn on at the time you set.
2. You can set two schedules, ie: Weekday and (3) Weekend.
Touching the day will make it active (blue) or inactive (grey).
Days displayed in blue are active for the times shown below the day icons.
Set the time on the left to the time that you usually go to bed, and set the time on the right to the time that you usually get up.
Note: If the first temperature setting on the Overnight screen is above zero, then the topper will start preheating 1 Hour before the scheduled start time.
4. The Start Length sets the duration of the Start phase. This phase begins at the scheduled bed time, and continues for the duration set here.
5. The Wake Length sets the duration of the Wake phase. This phase ends at the scheduled wake time (see 2+3 above), and starts earlier based on the duration set here. For example, if the wake time is 7:00am and the Wake Length is 30 minutes, then the Wake phase would start at 6:30am.
6. Touch the Save button to save your settings and exit the Scheduler Screen.
7. Touch the X icon in the top right corner to cancel and exit the Scheduler Screen without saving your changes.
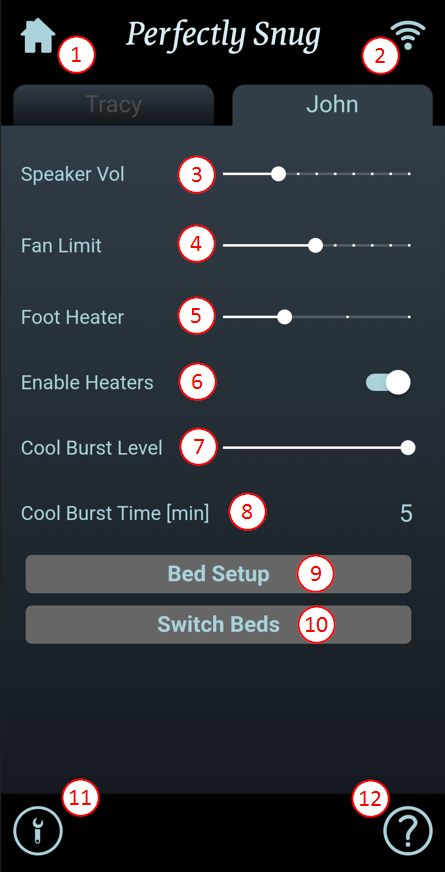
Settings Screen
1. You can go back to the Overnight Screen by touching the home icon.
2. You can go to the WiFi Screen by touching the WiFi icon.
3. Speaker Vol controls the volume of the announcer voice when the bedside buttons are used. Level 0 (slider all the way to the left) is off.
4. Fan Limit sets the maximum fan speed used during the Sleep and Wake phases. It has no effect on the Start phase or burst mode. Moving the slider left makes the bed quieter but also reduces the cooling performance. Moving the slider right increases cooling performance.
5. The Foot Heater has three levels. Level 0 (slider all the way to the left) is off.
6. If you never want the heaters to come on, then turn the Enable Heaters toggle off. This will stop preheating, foot heating, and automatic heating if you get cold. Normally the heaters should be enabled (toggle on) so that preheating, foot heating, and automatic heating work.
7. Cool Burst Level adjusts the strength of cool burst mode. Move this slider right to increase the airflow. Move it left for less airflow.
8. Cool Burst Time sets the duration of cool burst mode in minutes. Increase this setting if you want a longer Cool Burst or decrease it if you want a shorter Cool Burst.
9. You can access the Bed Setup Screen by touching the Bed Setup button.
10. If you have more than one Perfectly Snug bed, then you can switch to a different bed by touching the 'Switch Beds' button. [In the new app, this is called "Edit Names."]
11. Touch the wrench icon to access the Utilities Screen.
12. You can pull up helpful information about how to use the App by touching the question mark icon.
Setup Screen
The Setup Screen is displayed when you first open the App or when the App is not able to find your Smart Topper on WiFi.
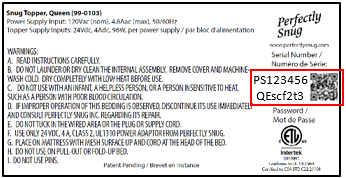
This screen allows your phone to connect directly to your Smart Topper on a special WiFi network named based on the Serial Number of your Smart Topper, like PS123456. It is password protected.
You can find the Serial Number, Password and QR Code printed on the label at the head of your Smart Topper and also in the Quick Start Guide.
Once you have connected your topper to your home WiFi network, this page will not come up again.
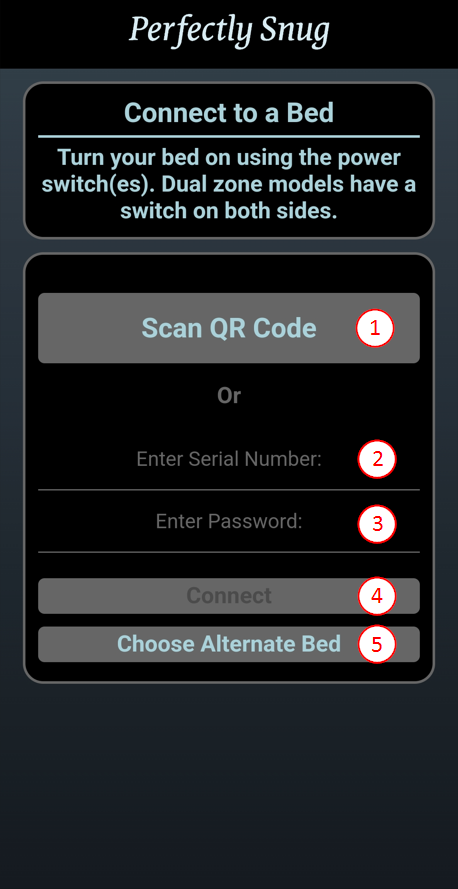
1. The easiest way to connect to the bed is to touch the Scan QR Code button, then use the camera on your phone or tablet to take a picture of the QR Code on the label at the head of your bed or in the Quick Start Guide.
2-4. Alternatively, enter the serial number and password on the screen, then touch the Connect button. Note that case is important.
5. If you have previously connected to a bed using the App and want to re-connect to it, then you can touch the Choose Alternate Bed button to navigate to the Bed Selection Screen.
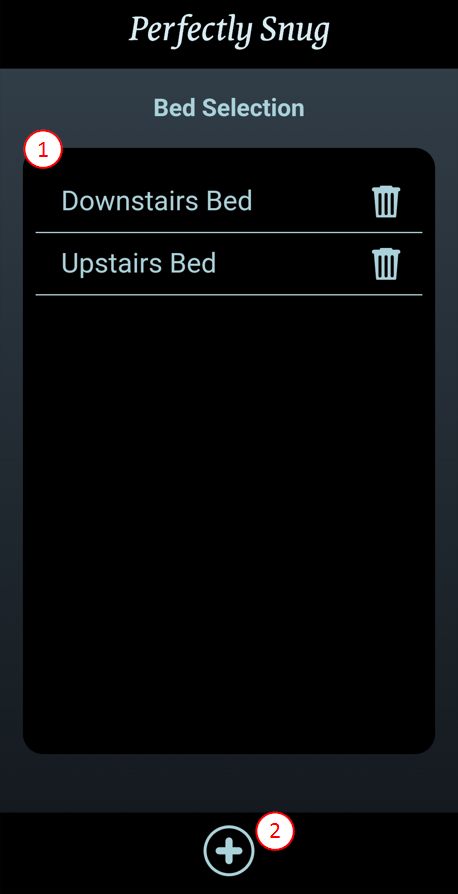
Bed Selection Screen
1. This screen will display a list of all previously connected beds. You can pick which bed to connect to by touching it. You can remove a bed from the list by touching the trash icon next to it.
2. If the bed that you want to connect to is not in this list, then touch the + icon to add it. This will bring you to the Setup Screen.
Utilities Screen
The Utilities Screen contains a menu that allows you to access the Information Screen, the Send Diagnostics Screen, and the Firmware Update Screen.
Product Information Screen
The Product Information Screen displays the App version number and some certification information about your bed.
Send Diagnostics Screen
This screen provides a way for you to send diagnostic data to Perfectly Snug if you have trouble with your topper. Please contact service@perfectlysnug.com before sending data. The data sent contains only technical diagnostic data and no personal information. Perfectly Snug has no access to your Snug Topper unless you initiate sending the data.
Firmware Update Screen
The Perfectly Snug Smart Topper has Firmware (software) that can be updated only upon your initiation. Firmware updates may be available from time-to-time and these are meant to fix minor issues or improve the product. Only update the Firmware if advised to do so by Perfectly Snug customer service.
Factory Reset
It is possible to initiate a Factory Reset. This should only be done at the direction of Perfectly Snug service support.